
FROZEN TISSUE PROCESSING TECHNIQUE
This article describes a tissue watering system for the preparation of frozen sections. The method differs from conventional target casting and is particularly suitable for thin samples and where greater tissue cutting is undesirable. It is based on potting down into steel potting molds of tissues down. It is a simple system that offers many advantages over conventional methods, including speed, high accuracy and reduced tissue waste. It easily adapts to most existing cryostats and requires minimal maintenance.
Watering
Introduction
Although tissue embedding is a simple process in cases where sample orientation is not a critical factor, there are cases where the ability to properly evaluate a sample depends on the perfect orientation of the sample in the block.
In conventional cryostats, the tissue is embedded by placing it face up on a tissue holder and covering it with a potting medium. The tissue holder or target is then inserted into the freezing block in the cryostat, where it freezes. In some cryostats, it is possible to press the freezing head onto the tissue at the right time, which also flattens the sample to avoid unnecessary tissue loss. However, this system has several shortcomings. It works properly in situations where a large volume of tissue is available and precise orientation is not essential. The sample can be cut to the required level. In some cases, this method is insufficient, high accuracy and the ability to orient the tissue is very important during processing. If such a sample is processed by the standard method of pouring the sample upwards by pressing the freezing head, the result may be lower quality samples which require significant cutting and may lead to the loss of important structures. In fragile tissues, the tissue may be crushed and thus additional tissue distortion of the preparation may occur. The method presented here approaches the technique of paraffin embedding.
An even bigger problem with freezing occurs with small and multiple samples and thin samples in which the tissue needs to be oriented.
Many techniques have been developed to help experienced laboratory technicians achieve better results in watering frozen samples.
When processing frozen tissues, great emphasis is placed on speed. When using a conventional system in modern cryostats, it may take 90 seconds or more for the block to freeze. For example, immersion of the tissue in liquid nitrogen or Cryospray is used to speed up the process. However, this fast process has limitations in precision.
This method, which is precise and easy to implement, was created by Dr. Stephen Peters President of Pathology Innovations, LLC, Wyckoff, NJ USA. The consumable described below is required for the method.
Watering chambers
Watering is performed in 1 inch thick stainless steel wells (Figure 1A). These steel encapsulation chambers can be rapidly cooled to the temperature required to freeze the tissue. The holes have bevelled walls, rounded edges and polished surfaces for easy block release. The author uses square holes with rounded corners with a base with a diameter of 18, 24 and 30 mm. The wells are stored in the cryostat in the deepest suitable place, where the temperatures are the lowest. During the watering process, they are moved to a higher or more accessible place. In many cryostats, a small work shelf can be installed for this purpose. The cryostat temperature of -23 to -27 ° C works ideally for quick freezing.
Sample holders – freezing targets
Freezing targets are designed as square with sharply cut grid-shaped channels to maximize the gripping force of the holder (Figure 1B). The grid allows the excess medium to drain away and the width and depth of the channels allow the penetration of the freezing medium and guarantees adhesion to the block. The targets are made of stainless steel, maximizing their freezing performance and durability, and should ideally be stored in a box in a convenient location in a cryostat, as they allow the process of attaching the encapsulated tissue to be accelerated.
Cooling blocks
These blocks are constructed of rectangular steel blocks and act as a heat sink from the shank of the sample holder (Figure 1C). They are placed on the stem of the target and speed up freezing. The light pressure that it exerts on the block helps the target to adhere to the block. A small ridge on the shank of the housing splits the plane of adhesion that holds the molded shape of the block in the hole. These blocks also serve as a suitable flat freezing surface in the “plaster technique” described below.
Tissue transfer spatulas
The thin transparent vinyl spatula serves to precisely orient the tissue to the desired position and as a means to accurately transfer the tissue to the bottom of the pot (Figure 1D). The tissue is placed face down on it so that the desired part is visible after turning the slide face up. It can then be adjusted to the required position, and finally inserted into the potting well in this way.
Watering technique
Tissue orientation on a spatula
- Apply a small amount of potting medium to the spatula (Figure 2A).
- Orient the tissue as needed and transfer it to the spatula so that the face of the tissue — the portion you want in the top block — faces down (Figure 2B).
- After turning the spatula 180 °, you will see the tissue as it will look in the block. The position of the tissue can still be adjusted (Figure 2C).
Placing the tissue in the potting well.
- Pull the tissue from the spatula to the edge so that it protrudes about 1 mm. Move the hole closer to where you want the tissue to be frozen.
- As soon as the protruding edge of the tissue touches the bottom of the well, it immediately adheres in place thanks to the frost and the potting medium (Figure 2D).
- Slowly pull the rest of the tissue off the spatula.
Fill the well with potting medium
Fill the well with potting medium to maximum capacity to form a meniscus over the edge of the well (Figure 2E).
Attach the pad to the sample holder
Immediately after pouring the sample with potting medium, press the sample holder against its top (Figure 2F). Excess medium is expelled through channels in the cut grid of the target.
Cooling block location
The cooling block should be placed on the shank of the sample holder when using an unfrozen target or watering the blocks in 30 mm wells. In these cases, the sample holder should be cooled rapidly from above (Figure 2G).
Freezing time
Optimal freezing conditions are given with regard to the use of frozen sample holders, frozen wells stored in a cryostat at -24 ° C.
The optimal freezing conditions are as follows:
| Well size | Freezing time |
| 18mm | 20s |
| 24mm | 35s |
| 30mm | 60s |
Removing the cooling block
Remove the block from the stem. By quickly tapping the target shank with the cooling block, the block is released from the well (Figure 2H and 2I).
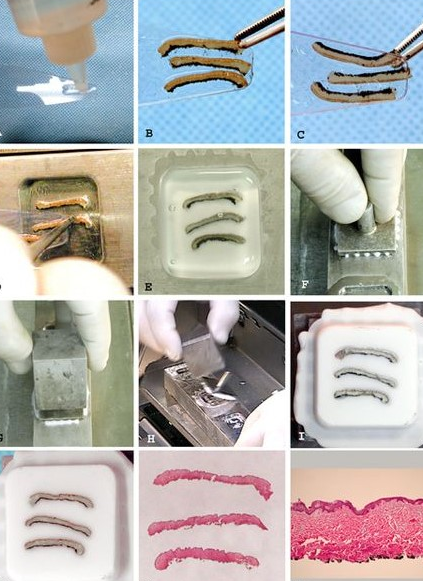
Figure 2. Watering technique. (A) Applying the medium to a thin layer on a spatula. (B) The tissue is placed at the end of the spatula in the exact position and orientation; Three strips of dyed dark pigmented leather, only a deep layer (no edges); length approximately 15 mm x 1.5 mm wide and 1.5 mm deep. (C) Rotate the spatula to inspect the face to be inserted into the wells. The tissue can be further manipulated to the exact position with emphasis on the desired. (D) The tissue is pulled slightly over the edge of the spatula and touches the bottom of the well, where it adheres to the cold steel. It is then pulled out from under the tissue. Samples that require precise placement can be flattened, manipulated, and guided to the desired position by slow and careful movement. (E) Filled well. The meniscus is bulging above the surface of the well. (F) The sample holder is placed above the smooth surface on the surface of the well. Excess medium is expelled through channels in the target grid. (G) Cooling block mounted on the target shank. (H) Remove the lock block. The block is peeled from the well by the sharp edge of the cooling block. (I) Finished block before the first cutting – a completely flat surface is visible, which requires only a small cut. (J) Cut block. The epidermis and ink are visible. (K) Photograph of a frozen block. Complete cut of all three pieces. (L) Photomicrographs of skin with well-oriented epidermis and clear depth of tissue removed (magnification 50x).
More details about the technique
Vinyl spatulas for sample orientation
It is advisable to have different widths of spatulas that fit into holes of different sizes. The view of the tissue through the spatula corresponds to how we see it frozen in a block and its orientation can be adjusted.
An example would be the requirement to freeze skin samples so that the epidermis or marked edge of the tissue is clearly visible. These situations can be used by using a spatula. After correct orientation on the spatula, the sample is frozen in the desired position.
A thin layer of potting medium ensures that the tissue adheres to the bottom of the well and also easily releases the block without tearing the tissue. It provides support for the tissue, which makes it easy to manipulate. It is not desirable to apply a thick layer of medium as it would create an uneven surface at the bottom of the well and thin needle biopsies or small multiple samples would not adhere to the bottom of the well at the same height. Figure 3 shows an artistic example requiring extremely flat watering. The samples in this case are dyed sesame seeds. It would not be possible for the sesame seeds to stick to the bottom of the well without the use of a very thin layer of embedded medium.
If there is no risk of cross-confusion of samples, several pieces of tissue can be placed in one block. For example, when sampling large tumors, up to four sections 1 cm in diameter can be placed in a 30 mm well. This allows you to cut multiple samples from one block at a time. However, if the location of the tissue collection needs to be respected – for example in the lymph nodes, this method cannot be used to avoid confusion of samples in the block.
Placing tissue in the well
Before placing the sample in the well, consider placing the tissue in the well in advance. If a large part of the tissue is placed on the bottom of the well, it is necessary to press it well to the bottom of the well with tweezers. If the length of the tissue is 2 cm, the well has a diameter of 30 mm, it is advisable to place the tissue to the edge of the well rather than to the center. If we place four squares of tissue with a diameter of 1 cm in a well with a diameter of 30 mm, they should be placed so that they do not touch and with about 3 mm free edge (Figure 4). The orientation of the tissue to the blade should also be considered. For example, the epidermis should be oriented perpendicular to the blade when slicing skin samples.
The use of a vinyl spatula allows you to orient the sample with considerable accuracy. For samples that do not require any orientation, the spatula can be pulled out quickly. For samples requiring precise orientation, this process should be performed more slowly and carefully. If the shape of the pattern allows, then its most important edge should be pressed down first. The spatula is then slowly pulled out from under the sample, and under gentle pressure using tweezers, the remainder of the sample is carefully pressed to the bottom of the well in the desired orientation. In the case of thin strips of skin from Mohs surgery, great care must be taken to ensure that the epidermis is completely visible and that the sample is placed in a plane. Samples that require significant flattening can be gently squeezed with smooth curved tweezers. Tube samples (bladder, vessels…) can be easily attached to the bottom of the well in a vertical orientation. Fragments of different membranes can be twisted or folded so that they stand on the edge of the dosing slide and are pulled out and stored in the same orientation.
Handling of liquid samples
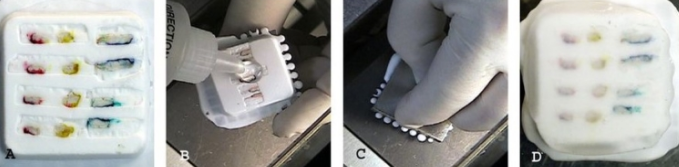
Liquids and very soft specimens, such as endometrial cleanses or aborted tissue specimens, can be placed in the well with a plastic spoon or spatula and placed neatly in the wells without crushing (Figure 5A and 5B).
For very bloody liquid samples, it will help to add a few drops of potting medium directly to the sample during freezing. Figure 6 shows an example of accurate fluid handling with this system.
Fill the wells with potting medium and place the sample holder
The potting medium must be poured into the wells so that the meniscus is convex and can penetrate the channels of the grid cut in the target of the sample holder. Then press the target firmly against the surface of the hole. Excess media is pushed out through the channels. This creates a firm connection between the block and the holder. The sample holder should be placed on the well as soon as possible after filling with potting medium.
Freezing times
Recommended freezing times are for guidance only, and include fully cooled wells and sample holders. The freezing time is longer if they are not cooled or if the samples are very thick. The user will soon learn to estimate when the block is ready. The potting chambers with wells should, after use, be returned to the lower level of the cryostat to maintain the optimum temperature. To achieve maximum efficiency of the method, the sample holders should be thoroughly cleaned, dried and returned to the cryostat for cooling after use. There is considerable temperature variability in the cryostat, depending on which level you are at from the manipulation window. The potting shelf is installed at a higher level to perform critical delicate manual operations. When working on the potting shelf, the potting chambers with wells, sample holders or blocks are heated above the optimum working temperature.
Handling multiple samples
When handling multiple samples that need to be placed in blocks separately, this embedding system makes it possible to process tissues very quickly. You should have a spatula ready in advance. You can easily label the sample holders immediately after placing them on the well. If the targets are sufficiently cooled, the blocks can be removed from the wells approximately 15 seconds before freezing is complete. The freezing process is completed in the block on any surface at the bottom of the cryostat and you can prepare more samples. If it is necessary to fill all four wells, it is recommended to pour two blocks first, take them out of the chambers for freezing. Then continue with the other two samples. By the time you need to cut the first cast blocks, they are already sufficiently frozen. Eight blocks can be frozen in less than 2 minutes.
Remove the finished block from the well
The cooling block located on the target shank easily releases the blocks. Its sharp edge disrupts the cohesion that forms between the cooled steel and the frozen medium. It is almost impossible to remove the block from the well of the target because the adhesion of the medium to the well is strong, especially in large wells. Thanks to the use of an edge, the block is released with ease.
The blocks will remain intact, even if they are not completely frozen, provided that the surface of the target is fully frozen to the block.
If the block holder is not held in place and pulled out, this is either due to insufficient filling of the well with medium or the use of a warm chuck without a cooling block. A simple and quick remedy of the situation is possible by adding another layer of potting medium and applying a new cooled target to the block.
Filling in defects in the block
This technique is used to repair any holes, defects or crevices that may appear on the surface of the block prepared by this method (Figure 7). Occasionally, a small space may form on the surface of the block between the medium that covered the tissue and the medium that filled the well. This space is only superficial and will be quickly cut during slicing. Where only minimal trimming is allowed, you can fill in the defects by this process and you will get a block that will be cut better without these defects. Figure 7A shows an example of surface irregularities that can be seen in a frozen block. The technique is performed as follows:
• Apply a drop of potting medium to any significant defect on the upper surface of the block (Figure 7B).
• Press the block against the freezer (figure 7C).
• Release with an edge or pull out the block (Figure 7D).
• The medium can be applied directly from the bottle as a drop. If you already have the block clamped before slicing, the drop can be pressed against the block with a cooling block. The technique can be used even if the tissue has been frozen too close to the edge. It is thus possible to add an edge from the potting medium to the edge of the block for better slicing.
Tissue orientation on a knife
This is an extremely important aspect of preparing frozen slices. Using a well insertion system, it is relatively easy to prepare and orient the tissues in the wells so that the knife meets the tissue in a certain orientation. Based on experience, the following rules apply:
- Grease should be the last thing to hit the knife blade or be cut around the edge separately (Figures 8A and 8B). The fat is not stiff enough at temperatures that are good for slicing most tissues. When grease hits the blade in front of another tissue, the rest of the sample may be destroyed. This must be kept in mind when placing the sample in the well.
- The most critical edge of the tissue should be perpendicular or diagonal to the blade. It should not be placed at the beginning or end of the cut. Look at the cut as if it had a beginning, a middle and an end. In the beginning, there is a risk of twisting or damage (if you use a brush or hook), or there may be thickness problems, which are opportunities for artifacts. Similarly, in the end, the tissue may twist or expand when applied to glass. The blade passes through the middle part most easily. There is less likelihood of artifacts.
- Epithelial and mucosal tissues, such as skin and gastrointestinal specimens, bladder, uterus and cervix, should be oriented with the plane of the epithelium perpendicular to the blade. When watering, the end of the skin ellipse that meets the blade first tends to twist. The diagram in Figure 9 shows the approach of embedding the small skin ellipses so that the blade hits the longitudinal edges (2-5) for the last time.
Clearly, there are many slicing alternatives based on your experience. This potting technique is able to give you the opportunity to orient your sample as needed for easier slicing.
Discussion and conclusion
This face-down tissue embedding system reproduces all the benefits of paraffin embedding used in routine histology. The properties of the tissue that immediately adheres to the cold steel make this process easier than embedding in paraffin. The system provides significant advantages over available methods for pouring frozen biopsy specimens, including speed, accuracy, less tissue waste, ease of learning, and convenience.
The speed with which slices can be obtained is improved on several levels. The preparation of individual blocks is significantly faster in this way. Using this system, blocks are frozen in 20s in small wells and within 1 minute in large wells. This system increases the speed of preparation of multiple blocks at once. Once the wells are filled, there is no need to monitor the freezing process of the sample to capture the correct moment of applying the heat extractor. If you have to process several samples at once from different operating rooms, this pouring technique saves valuable time and further operations can be performed in the cryostat while the blocks are frozen. Speed is also improved by not needing to cut more blocks. A large well with a diameter of 30 mm allows you to evaluate wider tissue sections or more samples at once, which can be placed in one well. Another advantage is that all the blocks are prepared to be flat or similar thicknesses, the clamping mechanism for the sample holder being approximately parallel to the surface of the tissue. This leads to less cutting of the blocks and less need to adjust the angle of the sample holder.
An essential feature of this technique is the ability to obtain a flat block with a defined tissue orientation, which improves the ability to obtain an accurate diagnosis. It allows the laboratory technician to orient the sample precisely, with the desired tissue surface in the slicing plane. Plastic potting molds have previously been used for this technique. The advantage of this technique over the use of plastic molds is the natural property of the tissue to adhere to the cooled metal surface – the tissue is easily placed in any position by adhering to the bottom of the well. The flower petals in Figure 10 are simply placed in a drop of medium and therefore stand on the edge.
This system also prevents the formation of unwanted tissue crushing artifacts caused by the use of a heat extractor in conventional cryostats.
Thanks to the flat block, the need to significantly shorten the block is reduced. Figure 11 is a block with 51 poppy seeds arranged in one plane. If we consider the analogy that we received 51 small brain biopsies the size of a poppy, what is the chance, using conventional methods, that all 51 biopsies could be cut in one frozen section at the same time?
The technology is simple and easy to practice. Even a laboratory technician with little experience can prepare samples that cannot be achieved by conventional methods.
Placing the watering shelf under the front opening of the cryostat maximizes comfort and efficiency when watering. The system uses tools that simply work directly in the cryostat. The tools are made of stainless steel, which ensures long life. The only potential needs are vinyl spatulas. But their price is low. In addition to the potting medium, there is no need to purchase expensive consumables, such as liquid nitrogen or Cryospray. If you are going to use a potting shelf, simply place two screws on the front wall of the cryostat. The service technician should be able to handle this operation.
The only maintenance required is the occasional wiping of the wells with alcohol-soaked gauze. Occasionally, in cases where disintegrated necrotic tissues or bloody fluids are placed in a well, the wells need to be cleaned. In general, a layer of potting medium placed on a dosing slide creates a clear plane of cleavage. Any microscopic remnants of tissue that could remain at the bottom of the well and adhere to the next new block are cut with the first tissue cut.